The number of MOOCs, or Massive Open Online Courses has grown exponentially in recent years. These interactive online courses allow learners to access a huge amount of educational content on countless subjects, generally with little to no entry requirements, and often entirely free of charge. With many top schools like Harvard, MIT, or Yale offering their own courses, MOOCS are very effective to help scaling career development and corporate eLearning.
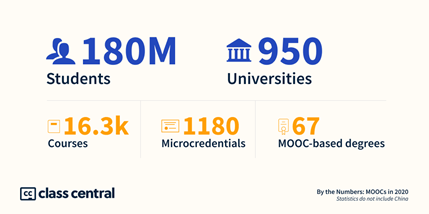
And MOOCs’ importance are likely to grow. Given the ongoing Covid-19 crisis and the shift to remote working, online education has naturally followed suit – Coursera, a leading MOOC platform, saw a 640% increase in enrolment during the lockdown period. Equally as impressive, the modern MOOC movement has now reached 180 million learners. More than 900 universities are offering over 16k courses combined. In fact, Coursera’s president, Daphne Koller predicts that full undergraduate online degrees may be available within the next five years. Online learning seems to be the future or a very valuable supplement to traditional classroom-based learning at the very least.
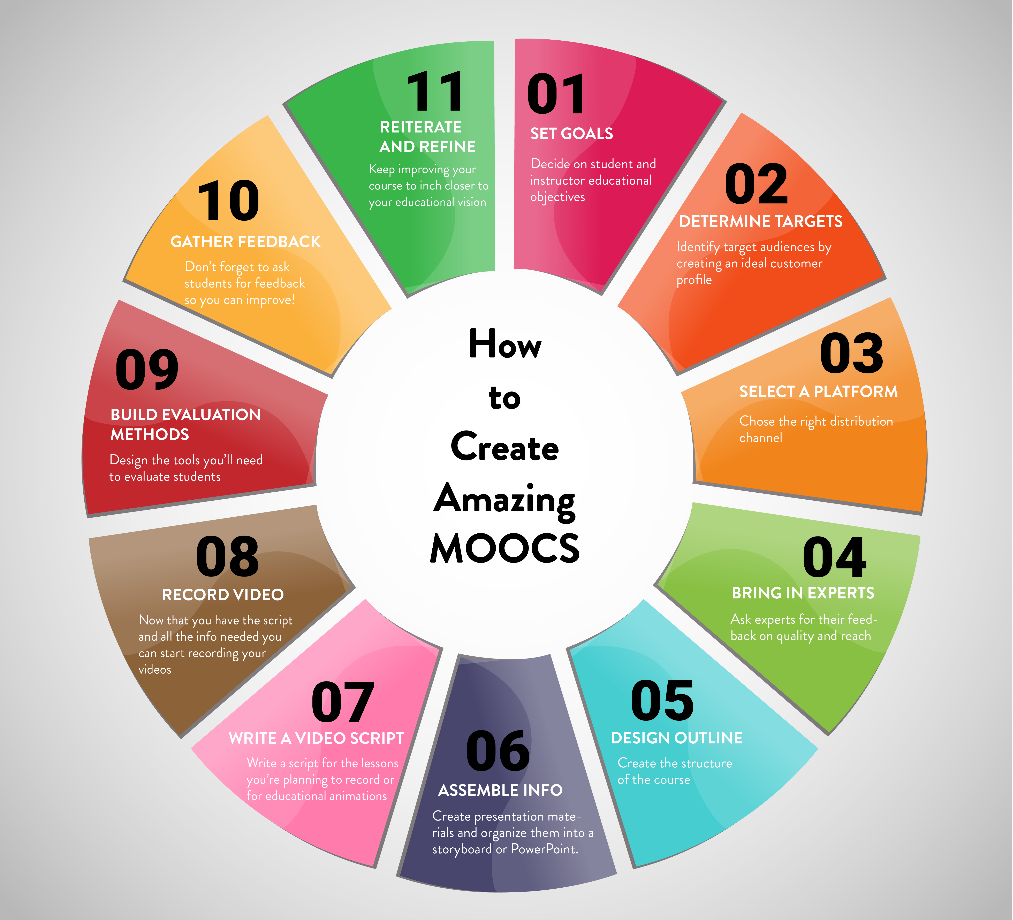
Now that we have underlined their importance, we’re going to offer you a practical step by step guide to creating amazing MOOCs so that you can master this educational format. Let’s get started!
1
Set educational goals
The first step is certainly to reflect on student and instructor objectives and to set them. This is about laying the groundwork. Educators need to decide on the real purpose behind creating a MOOC in the first place. The end goal here should be to educate and share knowledge in an accessible way. What exactly do you want students to know by the end of the course? It may also be worthwhile to check what else is available on the market and what resources you’ll need to fulfil this project.
2
Determine the target audience
Another fundamental step is to figure out the target audience. One method of achieving this is by creating a learner persona. What do they need? What might their learning outcomes be? It may also be worth considering their demographics. We already know that 80% of users have a degree, and that the average age is between 25 and 35. What more can you find out?

Source: pxhere.com
3
Select a MOOC platform
Next up, it’s time to decide on a platform. It’s best to use something readily available than go out on your own here. The main platforms are edX, Coursera, and Udemy. It’s worth looking at each one individually to see how your educational visions align. You can also have a look to see which platform you competitors use to share their MOOCs. For more detailed information on each platform offering, check out the comparison table here.
Creating your own learning platform is relevant if your need to stay aligned with the existing learning culture. If so, make sure to display an internal digital library with a clear structure. The user experience quality prevails over the quantity.
4
Bring in experts
To ensure that your course is a resounding success, you’ll now want to consult experts in the field. Subject matter expert (SME) are both primary sources of information and idea generators for e-learning course developers. They’ll help you to create learning objectives, provide content on specific topics, and validate and enrich course material. Remember, without real expertise it’s likely the course won’t be valuable to learners. Meanwhile, Instructional Designers (IDs) can help provide this expertise to learners in a fruitful way, making sure learning outcomes are reached. It is essential that SMEs and IDs work well together to meet your educational vision.
5
Design the course structure
Before jumping into production, we’re going to create the course structure. That means elaborating the structure (usually 10–12 course modules), the key concepts and deciding how you’ll deliver the information. It’s likely that your chosen MOOC provider will have their own set format that they want you to follow. This certainly isn’t a bad thing as it simplifies the task, offering guidelines on videos, quizzes, discussion boards, polls, etc. This ensures cohesion all around the board, which is surely helpful for your students. Just bear in mind your target audience and learning outcomes throughout this process as discussed above.
6
Assemble the information
Now we’re really getting into the nitty-gritty of things. This phase is quite a big one and clearly too broad to fully delve into in this article. Here, you’ll create all your presentation materials, whether text, photos, icons, graphics, infographic content, or animations. You’ll then put all these materials together to summarise the course in a succinct manner. This can be done via a storyboard or a PowerPoint presentation. Learn more about the best way to produce and gather contents with Microsoft 365 in this article
7
Write a video script
In order to optimally engage your students, you’re going to want effective video content. Video helps your content being more engaging as it conveys tone and emotion more effectively than written text. As it is often the case, first go back to your initial goal. Remind yourself of your target audience, what the learning outcomes are and what your purpose is in creating this MOOC. More practically, it’s about creating an engaging and captivating narrative. For more information on script creation, you can head to Coursify.me’s article on the subject.
This preparatory work includes creating the teleprompter text. Very helpful for any kind of speech (except for improvisation), it helps focusing on your body language and avoiding the verbal tics. Rapidmooc provides a smart digital teleprompter feature. Find out how you can the get most of it here
8
Record video
It’s time to record the videos for your course. There are a few ways you can go about this. You can either produce the video yourself, using a webcam and uploading the videos to YouTube, or you can go the more professional route, with high-quality video, numerous cameras, lighting equipment, crews etc.
Alternatively, you can use a Rapidmooc video studio to create your informative video content. With its full HD camera, slim design and easy to use proprietary application, the Rapidmooc studio is an all-in-one, ready-to-use self-serve video studio that opens up an amazing range of possibilities on par with the professional route but in a very cost effective manner. Needless to say, it even has script and presentation scrolling and fun video effects… all you have to do is come with your ideas.
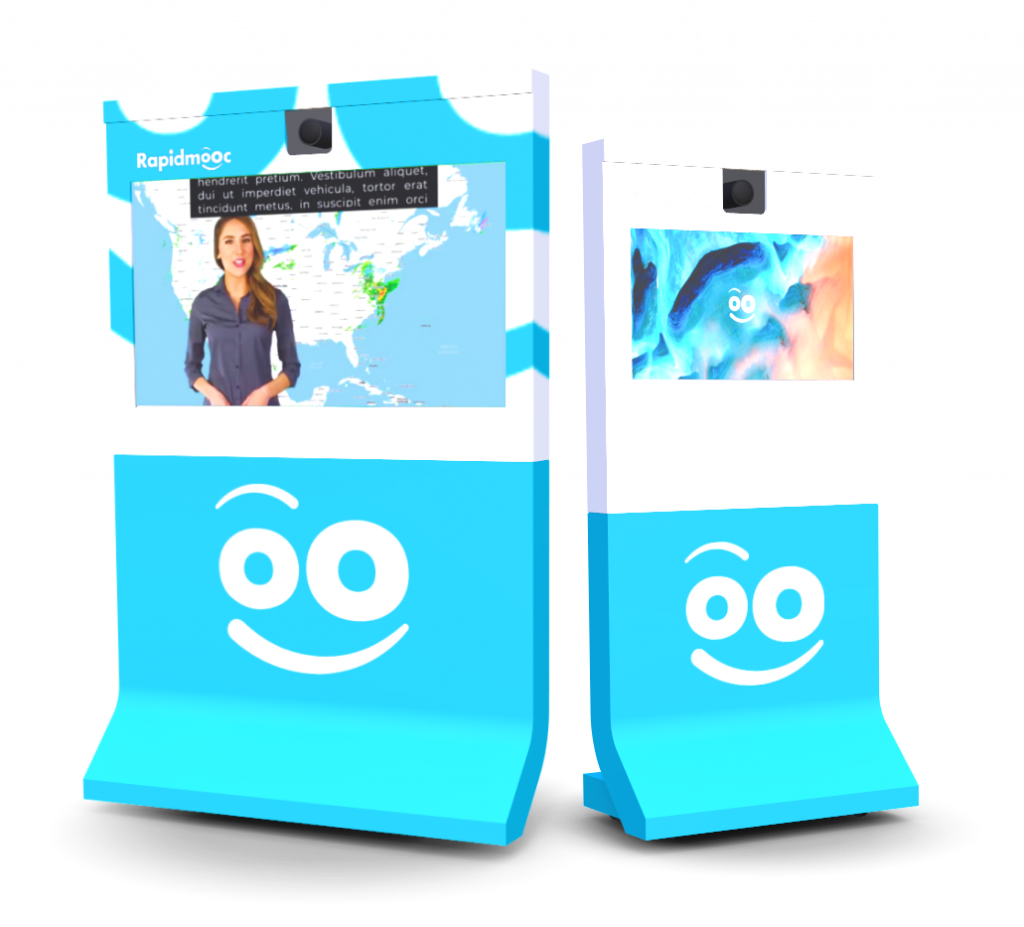
Pictured : the Rapidmooc Pro video studio.
9
Build means of assessment
With the bulk of the work out of the way, it’s time to design the tools you’ll need to evaluate students. Quizzes and tests are the primary method for assessing knowledge. These allow you to monitor your students’ progress and assist in increasing learner engagement and retention of information. Make sure, however, that they are well integrated in the course structure, and that they are relevant and well written. Depending on the platform, this may vary in practice, however there are numerous informative guides that explain how exactly to go about this step. For example, check out edX’s free course on using their course-authoring tool, edX studio.
10
Gather feedback
Well done, you’re now ready to release your MOOC into the wild. That doesn’t mean you can rest on your laurels. Now’s the time to check for any teaching inadequacies, taking a look at the overall cohesion of your course and measuring the consistency and balance of the modules. You should also check to see whether you met your performance indicators in terms of the number of students enrolled, the no-show rate, course completion rate, etc. These metrics are often offered by your MOOC provider and can be invaluable. Perhaps most importantly, get feedback from your students! This is a sure-fire way to find out what worked well and what needs to be improved.
BONUS
Reiterate and refine
You’d be forgiven for thinking that’s all there is to it. In fact, if your MOOC is successful, you can expect to update it regularly as you find new ways to flesh out content. You’ll also need to maintain a continuous dialogue with your students and implement their feedback you’ll have gathered in the last step. The payoff? Inching ever closer to your educational vision all whilst students achieve their learning objectives. How does it sound?
The first step is certainly to reflect on student and instructor objectives and to set them. This is about laying the groundwork. Educators need to decide on the real purpose behind creating a MOOC in the first place. The end goal here should be to educate and share knowledge in an accessible way. What exactly do you want students to know by the end of the course? It may also be worthwhile to check what else is available on the market and what resources you’ll need to fulfil this project.