Making professional videos is pretty simple. You stand in front of your Rapidmooc studio, turn on the LED lights, the microphones, the camera and off you go. Having your own professional recording space is an undeniable asset. Once positioned in your premises, the recording studio and its accessories become a reference point for shooting your videos. After a short training session, any user will be able to easily use the self-service solution, without the need for special technical knowledge. But how do you properly set up your recording room for efficient productions?
Experience has shown that four elements have a significant impact on the quality of your videos as well as the ease of their production. In multiple customer projects and in our own showrooms, we have seen time and time again that there are four key criteria to consider when designing a room:
- The size of the room
- The lighting
- The insulation of the room
- The background
The area is important
You have a room available as a recording studio? Great! We recommend a room size of between 12 and 40 square meters to use the Rapidmooc solution. In this setting, videos for which you want to use green screen can be shot in ideal conditions.
Of course, you can also set up the Rapidmooc studio in a larger room or even in an auditorium. In this case, the use of a green screen is not necessary because the environment of such a room is ideal for recording events. For example, you can easily film entire conferences or even public award ceremonies – formats where the green screen has no real added value.
One of our customers once told us that they used the Rapidmooc studio at a graduation ceremony to organize a dynamic live stream. In addition to the Rapidmooc camera, an external room camera was connected so that the live stream could switch between the speaker’s view at the lectern and the room’s view. A staff member facilitated these scene changes during the graduation ceremony.
Being in the spotlight
When shooting video, direct sunlight is your enemy. From light reflections on lenses to overexposed faces or unflattering drop shadows, this force of nature is uncontrollable. For example, if you’re shooting at sunrise or sunset and you have a window in your recording room, the quality of the green screen immersion can vary greatly depending on the amount of sunlight.
The impact of daylight can therefore mean that, depending on the time of day, you may need to adjust the green background settings on the Rapidmooc or even the settings of the LED lights. This undoubtedly takes more time and can make video production more complicated than necessary. Therefore, the ideal room when using the green screen mode is windowless to prevent external light sources from interfering with the recording, especially on a sunny day. Otherwise, opaque curtains or blinds are also suitable for darkening the room.
Now the room is dark, but of course you need light sources to record. That’s why the Rapidmooc studio comes with four LED lights that will set the stage perfectly for your video production. Place two of these lights to the right and left of your all-in-one video studio; they will illuminate the speaker’s face. Be sure to set them as high as possible to avoid any reflections in the glasses. Place the other two lights just behind the speaker so that they illuminate the green screen and prevent the speaker’s shadow from falling. You can also indicate where the speaker should stand by marking the floor. A uniform ceiling light is also beneficial; ideally dimmable LED panels. Keep in mind that flickering fluorescent tubes or similar uneven lighting can detract from the quality of the green screen immersion.
Installation of LED lights in the recording room
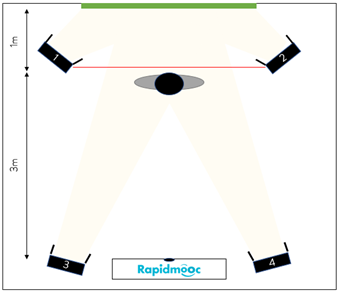
View from above
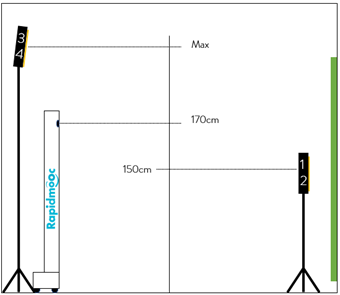
Side view
The sound makes the music
Thanks to the microphones included in the Rapidmooc, your voice is recorded clearly. But the environment has a lot to do with it! So it’s best if your new recording studio isn’t adjacent to the loudest classroom or machines, so that ambient noise doesn’t interfere with the recording. Again, the fewer windows the better.
If it is not possible to choose a somewhat insulated room, good insulation with sound absorbing material is another option. This is not necessary to achieve good sound quality, but can eliminate background noise from adjacent areas.
The choice of the background
To create videos that are compelling at first glance, they must of course have an attractive background. Depending on the recording modes (green background, augmented reality or rich media) you want to use, you will need a green or “real” background.
If you plan to use Rapidmooc in a lecture hall or at an event, you usually don’t need an additional background, but you can use the environment in the room. When you produce a video in a recording room, you can be as creative as you want. For example, you can paint a wall in your organization’s colors or apply wallpaper according to your wishes – be careful with texts and logos, as you should keep in mind that the background is reflected in the recording in Rapidmooc’s standard settings.
Want to use the green screen mode to integrate the speaker into a virtual background? Simply use the flexible green screen provided. If you want to use green screen mode frequently, it’s also a good idea to paint a wall in your recording room green to give you more room to maneuver when recording.
Do you have two walls available that are suitable for video production? Great! Then you can easily switch between green screen and augmented reality recording modes by simply rotating the Rapidmooc on its axis – after all, it is on wheels 🙂
A few more tips for the deluxe recording room
Some of our customers are very creative in the design of their Rapidmooc parts and like to optimize them to the maximum. We would like to share some of these ideas with you:
- To avoid unwanted interruptions during video recording, an “On-Air” panel can be placed outside the room. If it lights up, you know before you even walk in the door that you better not disturb now!
- Adding a lectern where you can place your keyboard and laptop will result in an even better recording experience and a sense of security for the speaker that will be evident in the final video.
- You’ll also be able to connect all the power sources to a single switch; one click on it and everything starts up: the LED lights, the Rapidmooc video studio, and maybe even the “On-Air” panel you have installed outside the door.
These elements aren’t essential to creating great videos, but they do make the user experience even more engaging. And the more your users enjoy being in the Rapidmooc location, the better videos they will produce!
You enjoyed this article, but you still have questions about the design of your professional recording room? Please contact us!
Lorem Ipsum
Rédacteur
